
Conseils et astuces de zoom: 19 fonctionnalités cachées pour améliorer vos appels vidéo aujourd’hui
Sarah Tew / CNET
le Zoom visioconférence et l’application de chat est devenue la très populaire héberger des millions de personnes travail, en train d’étudier et socialiser à la maison pendant la pandémie. Malgré un nombre de problèmes de confidentialité et de sécurité qui a surgi parallèlement à la croissance rapide de la plateforme, elle comprend désormais chiffrement de bout en bout et d’autres moyens de protégez votre compte et vos chats de Zoombombing et autres défauts de confidentialité. Comme Vaccins contre le covid-19 déployé dans tout le pays, Zoom a ajouté de nouvelles fonctionnalités pour aider préparer le futur bureau hybride, aussi bien que outils utiles pour les présentations – et plus de réactions emoji.
Que vous utilisiez Zoom depuis des années ou que vous veniez de vous inscrire l’année dernière, il existe un certain nombre de conseils, astuces et fonctionnalités cachées utiles et amusants que vous pouvez trouver pour améliorer votre expérience de chat vidéo et rendre vos visioconférences un peu moins bizarres – et j’espère éviter Zoom fatigue et Zoom anxiété.
Voici 19 façons de devenir un maître Zoom.
Lire la suite: Conseils ultimes sur la webcam: comment avoir une belle apparence et un son en ligne
Sommaire
1. Changez votre parcours

Changez votre arrière-plan Zoom en espace ou en une photo personnalisée.
Capture d’écran par Alison DeNisco Rayome / CNET
Transportez-vous pratiquement à la plage, dans l’espace ou partout ailleurs que vous pouvez imaginer en personnalisant votre arrière-plan lors des appels Zoom – tout le monde le fait ces jours-ci. Vous pouvez lire notre guide étape par étape pour changer votre arrière-plan Zoom sur le bureau et l’application mobile, mais en gros, vous accédez à Paramètres> Arrière-plan virtuel et sélectionnez ou téléchargez l’image que vous souhaitez à partir de là. Cependant, vous devez vous assurer que votre système répond à toutes les exigences faire cela.
Lire la suite: 10 applications alternatives gratuites de Zoom pour les chats vidéo
2. Changez votre nom sur Zoom
Vous souhaitez modifier le nom qui apparaît lorsque vous participez à une réunion Zoom? C’est facile. Il existe deux façons: temporaire et permanente. Si vous souhaitez modifier votre nom uniquement pour la réunion en cours à laquelle vous participez, après avoir accédé à la réunion, cliquez sur le bouton Les participants bouton en bas de l’écran. Survolez votre nom et cliquez sur Plus> Renommer. Tapez le nom que vous souhaitez voir apparaître, puis cliquez sur d’accord.
Si vous souhaitez modifier votre nom pour chaque réunion à venir, accédez à la Portail Web Zoom et connectez-vous à votre compte. Cliquez sur Profil. Dans le coin supérieur droit en face de votre nom, cliquez sur Éditer. Saisissez le nom que vous souhaitez sous Nom d’affichage, puis cliquez sur Sauvegarder les modifications. Votre nouveau nom devrait apparaître dans chaque réunion à partir de maintenant, mais vous pouvez toujours le modifier pour des réunions individuelles en suivant les étapes ci-dessus si vous le souhaitez.
3. Ajoutez une photo de profil sur Zoom
Zoom vous permet de changer votre nom et d’ajouter une photo de profil qui apparaîtra si votre appareil photo est éteint.
Sarah Tew / CNET
Semblable à la modification de votre nom, vous pouvez ajouter une photo de profil temporaire à toute réunion que vous rejoignez, ou une photo permanente pour toutes les réunions. Pour ajouter une photo de profil pour une réunion individuelle, après avoir accédé à la réunion, cliquez sur le bouton Les participants bouton en bas de l’écran. Survolez votre nom et cliquez sur Plus> Ajouter un profil photo. Sélectionnez l’image souhaitée sur votre ordinateur, puis cliquez sur Ouvert.
Pour ajouter une photo de profil permanente à vos réunions Zoom, accédez à la Portail Web Zoom et connectez-vous à votre compte. Cliquez sur Profil. Dans le coin supérieur droit en face de votre nom, cliquez sur Éditer. Sous l’icône de photo vide, cliquez sur Modifier> Télécharger. Sélectionnez l’image que vous souhaitez sur votre ordinateur, puis cliquez sur Ouvert. Réajustez la partie de l’image que vous souhaitez voir apparaître, puis cliquez sur Sauvegarder.
4. Coupez le son et éteignez votre caméra par défaut
Plonger pour désactiver le son et les boutons de la caméra dès que vous entrez dans une réunion peut vieillir. Empêchez vos collègues de voir votre tête de lit ou d’entendre votre chat hurler en les désactivant par défaut. Pour le faire, allez à Paramètres> Audio> Mettre le microphone en sourdine lors de la participation à une réunion, et alors Paramètres> Vidéo> Désactiver ma vidéo lors de la participation à une réunion.
5. Activez et désactivez le son avec la barre d’espace
Lorsque vous êtes appelé à parler, arrêtez de brouiller pour cliquer sur le bouton du microphone. Vous pouvez maintenir la barre d’espace enfoncée pour désactiver et réactiver rapidement le son de votre micro, directement à partir de votre clavier.
Lire la suite: Zoom, Skype, FaceTime: 11 conseils pour vos applications de chat vidéo

Watch this:
Weekend Zoom calls have exploded. Here’s how the company…
20:59
6. Turn on the beauty filter
At this point, if you know all of the work from home advice about getting dressed and ready like it’s a regular work day, but still don’t think you’re looking your best, Zoom’s Touch Up My Appearance feature may be for you. The filter aims to smooth over your appearance, making you look dewy and well-rested. If you’ve ever used beauty mode on your phone’s selfie camera, you know what you’re getting.
To turn it on, click the up arrow next to Start Video. Click Video Settings, and under My Video, check the box for Touch Up My Appearance.
Read more: ‘I am not a cat’: Find and use the infamous lawyer cat filter everyone’s talking about
7. Set up a waiting room for added privacy
You’ve probably heard about Zoombombing — when uninvited guests crash your Zoom meeting and disrupt it. One way to help prevent this from happening is by enabling the Waiting Room feature, so you can see who’s attempting to join the meeting before allowing them access. To do so, go to Account Management > Account Settings. Click on Meeting, then click Waiting Room to enable the setting. (We’ve got more tips on how to prevent Zoombombing in your meetings here.)
8. Create Zoom breakout rooms for smaller group discussion
Split your big Zoom meeting into up to 50 separate smaller sessions with breakout rooms. The meeting host can choose to split meeting participants into separate sessions automatically or manually, or can let participants select and enter any breakout session they like. The host can switch between sessions at any point.
To start a breakout room as the host, go to Account Management > Account Settings. Under the Meeting tab, go to Breakout Room, and make sure the setting is toggled on. You’ll also see the option to allow meeting hosts to preassign participants to breakout rooms. (If the Breakout Room option is grayed out, that means it’s been locked, and you need to contact your Zoom administrator.)

Zoom has lots of features to help your meetings run smoother.
Sarah Tew/CNET
9. Share your screen
Share your screen for a Zoom meeting (or to watch a movie or play a game) with other participants by clicking the Share screen icon on the toolbar at the bottom of the meeting screen. You’ll have the option to share your entire desktop, or just one of the windows you have open. Click the red Stop Share button at the top of the screen to go back to being a normal participant in the meeting.
10. React with emoji onscreen
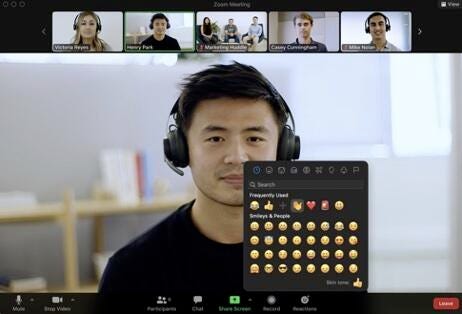
Zoom added a larger set of emoji reactions in an April update.
Zoom
If you’re muted in a meeting, you can still let the hosts know your thoughts with emoji reactions. Send a thumbs up or a clapping emoji to communicate without interrupting the meeting (by default, those reactions have a yellow skin tone, but you can customize that on the Zoom desktop app). In April, Zoom added about 40 emoji reactions, instead of the six previously available.
To react during a meeting, click the Reactions tab at the bottom of the meeting screen (it’s in the same panel as mute audio and video, to the right) and choose the one you want. Emoji will disappear after 5 seconds.
If the meeting organizer enables the nonverbal feedback feature, participants can place an icon such as a raised hand next to their name to communicate. Every participant will be able to see each other’s feedback.
11. Learn handy keyboard shortcuts
For those who don’t like clicking around their screen, Zoom has a ton of helpful keyboard shortcuts to help you navigate the app on your desktop without using your mouse. Find commands to join a meeting, start or stop recording, enter full screen and share your screen (more on that below). Check out Zoom’s full list of hot keys and keyboard shortcuts.
12. Turn on gallery view
Gallery view lets you see everyone in the meeting at once, instead of just the person speaking. To turn that on, click the tab that says Gallery View in the top right corner. If the meeting has 49 or fewer attendees, you’ll see all of their screens displayed on one page. If there are more, you’ll have the option to move between multiple pages. Change it back by clicking Speaker View in that same top right corner.
13. Put yourself in the same virtual background as your coworkers with immersive view
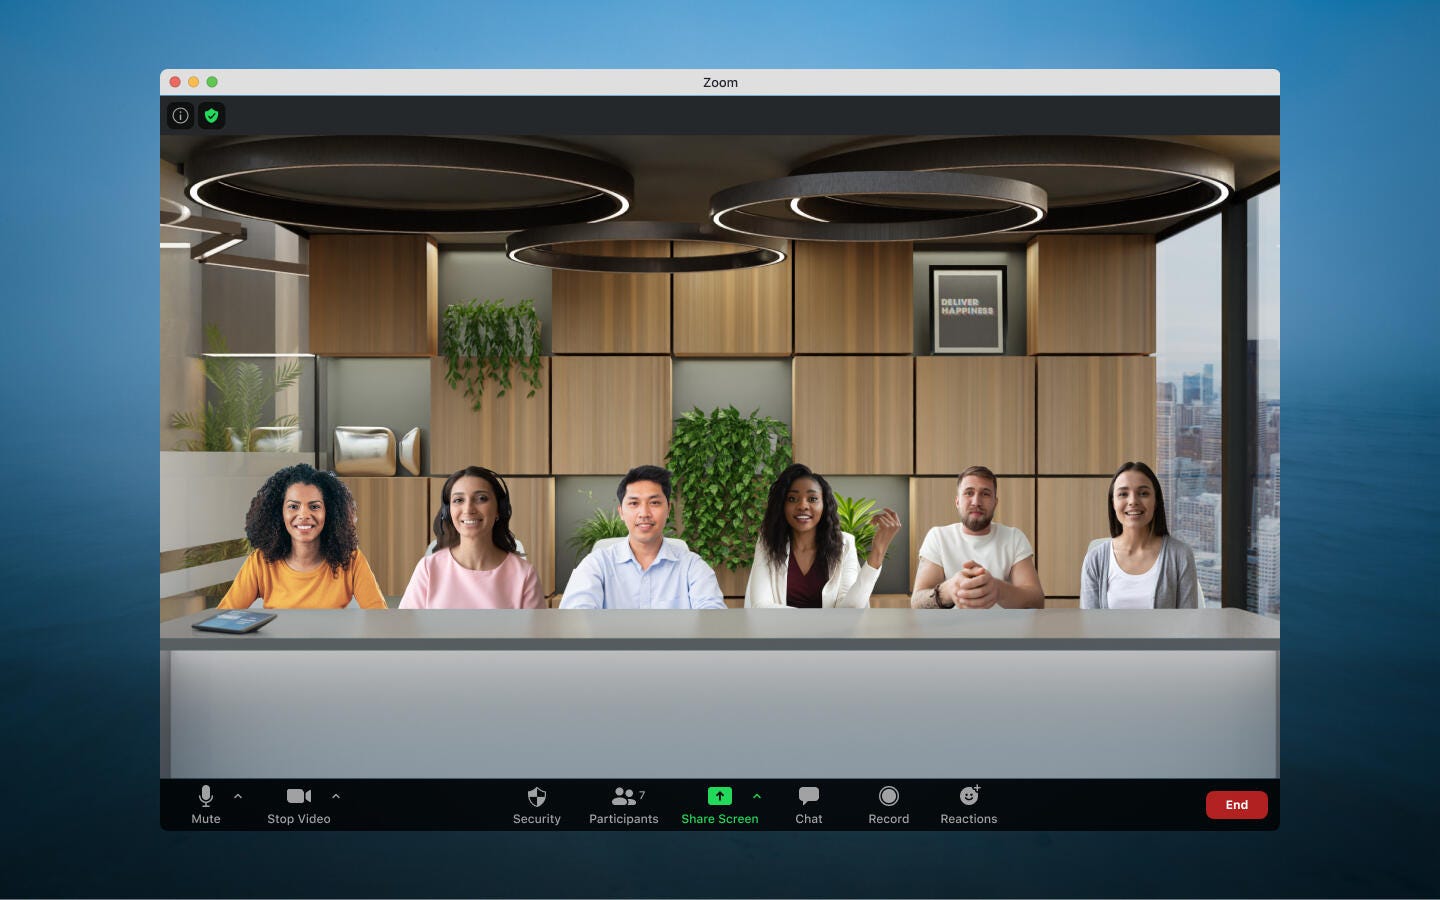
Try out Zoom’s immersive view feature to put yourself in the same virtual space as your fellow meeting participants.
Zoom
Zoom’s immersive view feature lets you put yourself in the same virtual background as your fellow video chat participants — be it a conference room, classroom or anywhere else you can think of. If you’re the meeting or webinar host, start the Zoom meeting on your desktop (it will be enabled by default for all free and single pro accounts using Zoom 5.6.3 or higher). In the top right corner, where you find Speaker or Gallery View, you’ll see the option to enable Immersive View. Click Immersive View, and choose from one of Zoom’s provided scenes, or upload your own.
Your meeting participants or webinar hosts will now be placed in the same virtual background and will appear that way on every participant’s screen.
14. Hide nonvideo participants
On a larger call, your screen can get cluttered with participants, which can be distracting, especially if some don’t have their cameras on. Hide the participants who aren’t using video by going to Settings > Video > Meetings, and check Hide nonvideo participants. Now you’ll only be distracted by your co-workers’ pets and children who appear on video.
15. Use the vanishing pen to highlight without having to go back and erase
Zoom’s vanishing pen feature lets you highlight text as you share your screen.
Zoom
Zoom’s vanishing pen feature lets you draw on your shared screen to call attention to text or objects, but then fades away so you don’t have to go back and erase your markings. To use it, share your screen, and click Annotate. On the menu that pops up, click Vanishing Pen.
16. Record the meeting to your computer
Both free and paid Zoom subscribers can record their meeting to their laptop or computer using the desktop app (you can’t record on mobile at the moment, unless you have a paid account — keep reading for more on that). Those recorded files can then be uploaded to a file storage service such as Google Drive or Dropbox, or a video streaming service such as YouTube or Vimeo.
To enable local recording, go to Settings > Recording, and toggle it on. When you’re hosting a Zoom meeting, click the Record icon on the bottom toolbar.
17. Record a meeting to the cloud
If you have one of Zoom’s paid plans (which start at $15 a month), you can take a recording that will save directly to the cloud (or to your computer if you prefer). Tap the record button on the bottom toolbar, and you’ll have the option to make it either local or in the cloud. You can do this on either desktop or mobile.
18. Host a group meeting longer than 40 minutes
On Zoom’s free basic tier, group meetings can only last up to 40 minutes (though one-on-one meetings are unlimited in time). To get unlimited group time, upgrade to a paid account.
19. Host more than 100 people
If you have a group of more than 100 people to host for work or school, you have to upgrade to a paid professional account. If you upgrade to the highest tier (Enterprise Plus), you can host up to 1,000 participants.
Watch our video on how to make your webcam video look and sound great online and make sure to subscribe to the How To Do It All channel on YouTube for more how to videos.